Apple Pay Integration Guide
Apple Pay is a mobile payment and digital wallet service developed by Apple Inc. It allows users to make payments in person, in iOS apps, and on the web using Safari. Users can add their credit, debit, or prepaid cards to their Apple devices, enabling them to make payments using these devices instead of physical cards.
Note: Apple Pay only works with the Safari browser. It is not compatible with Google Chrome and has never been.
Key Features of Apple Pay
- Contactless Payments Users can make secure, contactless payments at retail locations equipped with near-field communication (NFC) by holding their Apple device near the terminal.
- In-App Purchases Apple Pay can be used within supported apps on iOS devices for fast, secure checkouts.
- Web Payments On Safari, Apple Pay allows users to pay on websites without needing to re-enter card details.
- Security Apple Pay uses a feature called tokenization where the actual card number is not stored on the device or Apple servers. Instead, a unique Device Account Number is encrypted and securely stored.
- Privacy Apple does not track users’ transactions, offering greater privacy.
Apple Developer Setup for Apple Pay
To implement Apple Pay in your apps, follow these steps:
1. Create a Merchant Identifier
Register a merchant ID with Apple to uniquely identify your business for accepting Apple Pay. This ID does not expire and can be reused across websites and apps.
2. Create a Payment Processing Certificate
Using your merchant identifier, generate a certificate to secure transaction data. Apple Pay servers use the public key to encrypt the data. You or your payment provider use the private key to decrypt and process the payment.
Check which payment merchants are available for Apple Pay.
3. Enable Apple Pay in Xcode
- Open your project in Xcode.
- Select your project from the Project navigator.
- Choose your app target.
- Click the Signing & Capabilities tab.
- Click the + button and select Apple Pay from the Capabilities library.
- Click the refresh icon to sync your merchant identifiers.
- Select your desired merchant ID.
Create a Sandbox Apple ID
1. Create a New Apple ID
Go to Apple ID and register a new account. Use an unused email address. Verify your email by following the instructions sent to your inbox.
2. Sign In to App Store Connect
Visit App Store Connect. Sign in using your main Apple Developer account.
3. Add Sandbox Testers
Navigate to Users and Access in App Store Connect. Click the + button. Add the sandbox Apple ID. Choose any role (role does not impact testing). Click Invite.
4. Sign In on Your iOS Device
On your device, sign out of your current Apple ID. Sign in using the sandbox account. Go to Settings > iTunes & App Store and sign in again with the sandbox ID.
Add sandbox cards to Apple Wallet: Apple Pay Sandbox Testing
Apple Pay Payment Workflow
Prerequisites
- Apple Pay should be available in the country: Supported Countries
- Supported networks (from API):
.quicPay,.masterCard,.visa,.discover,.amex - Country code (e.g.,
US) and currency code (e.g.,USD) - Summary of items for purchase (e.g., product and price)
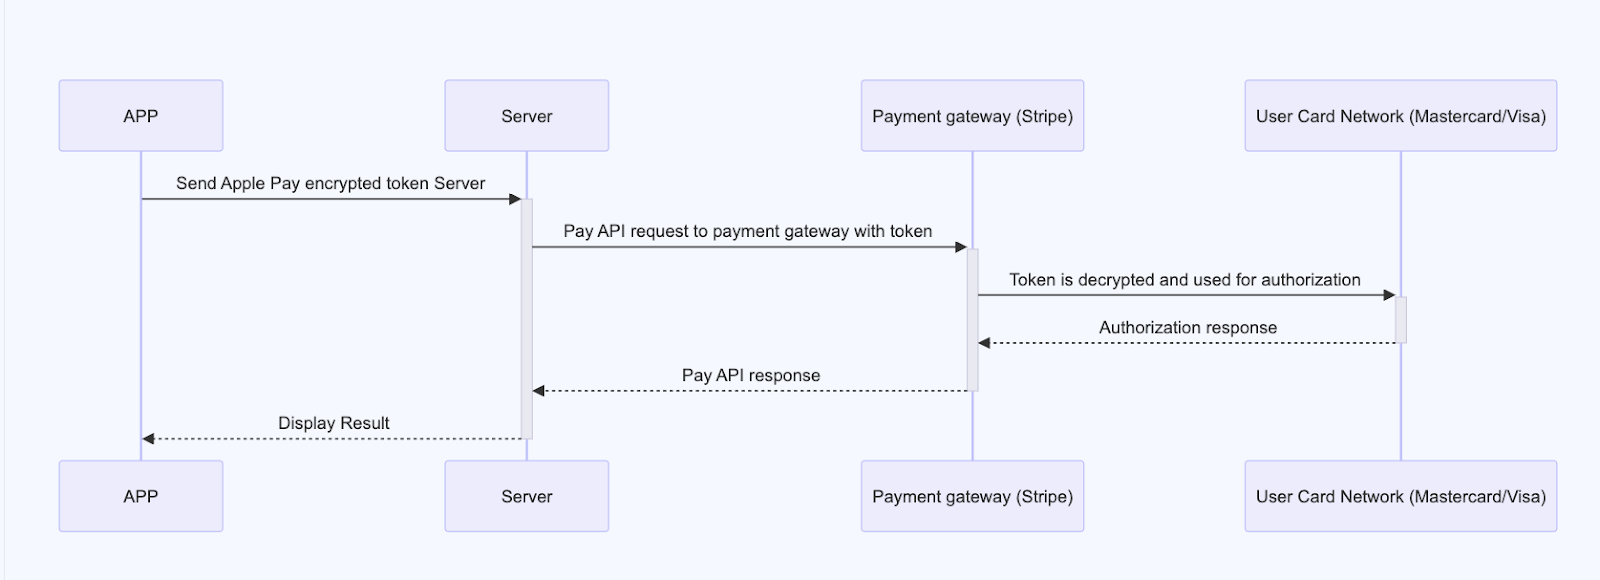
Payment Process
Once a user authorizes Apple Pay, the app receives a payment token, which is sent to your backend API. The server validates and authorizes the token via the merchant gateway and sends the result back to the app.
Example Token Data:
{
  "data": "...",
  "signature": "...",
  "header": {
    "publicKeyHash": "...",
    "ephemeralPublicKey": "...",
    "transactionId": "..."
  },
  "version": "EC_v1"
}
Note FYI: We won’t get selected card data until the user is not authorizing Apple pay payment.